Easter is a time for family gatherings, vibrant decorations, and of course, delightful treats. One such treat that perfectly captures the spirit of this festive season is Easter Cookie Bars. These sweet delights are not only visually appealing but also incredibly easy to make, ensuring you spend less time in the kitchen and more time enjoying the company of loved ones. With their colorful toppings and soft texture, these cookie bars become a hit at any gathering. They offer a wonderful blend of flavors that evoke the joy of springtime celebrations. In this article, we will explore how to create these mouthwatering bars from scratch using simple ingredients. Whether you are hosting an Easter brunch or looking for a fun activity to do with kids, making these cookie bars is an excellent choice. Plus, they can be made ahead of time and stored for later enjoyment. Let’s dive into the reasons why you’ll love making these Easter Cookie Bars!
Why You’ll Love This Easter Cookie Bars
- Quick and Easy: Minimal prep time and straightforward steps make this recipe stress-free, even for novice cooks
- Flavorful and Versatile: Enjoy outstanding flavor with ingredients you can easily customize by adding your favorites or adjusting spices
- Perfect for Any Occasion: Ideal for casual gatherings, holiday celebrations, or weeknight dinners
Ingredients for Easter Cookie Bars
Here’s what you’ll need to make this delicious dish:
- All-Purpose Flour: Essential for creating the base of your cookie bars; ensure it is fresh for the best results.
- Sugar: Granulated sugar provides sweetness; you can substitute some with brown sugar for added moisture.
- Baking Powder: This leavening agent helps your cookie bars rise; ensure it is not expired.
- Salt: A pinch enhances all flavors in your dessert; use fine salt for even distribution.
- Butter: Use unsalted butter at room temperature for easy mixing into the batter.
- Eggs: Large eggs provide moisture and structure; ensure they are at room temperature before mixing.
- Vanilla Extract: Pure vanilla extract adds rich flavor; avoid imitation versions if possible.
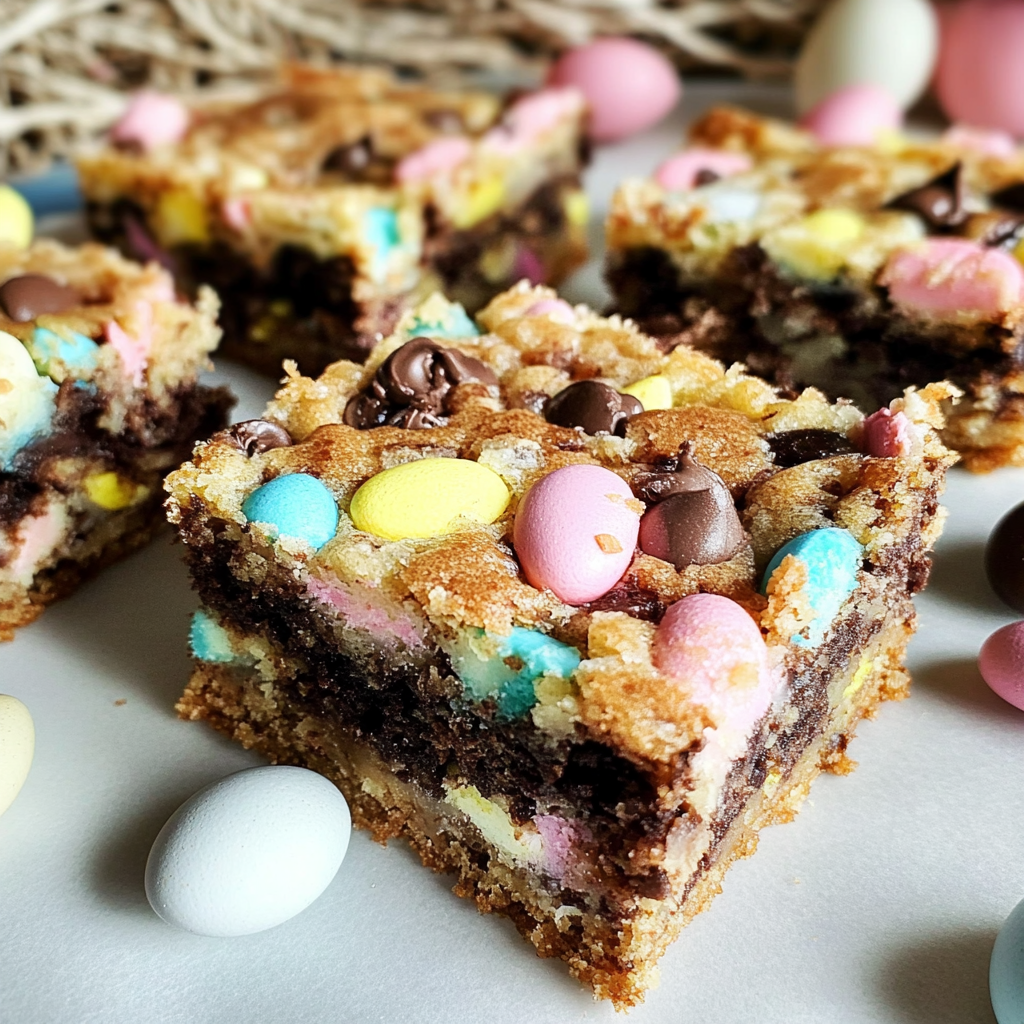
- Candy Sprinkles: Use colorful sprinkles to decorate your cookie bars; they add festivity and fun!
The full ingredients list, including measurements, is provided in the recipe card directly below.
How to Make Easter Cookie Bars
Follow these simple steps to prepare this delicious dish:
Step 1: Preheat Your Oven
Start by preheating your oven to 350°F (175°C). Line a baking dish with parchment paper or grease it lightly with cooking spray.
Step 2: Prepare the Batter
In a large bowl, cream together the softened butter and sugar until light and fluffy. Add in eggs one at a time while mixing well after each addition. Then stir in vanilla extract.
Step 3: Mix Dry Ingredients
In another bowl, whisk together flour, baking powder, and salt until well combined. Gradually add this dry mixture to the butter mixture until fully incorporated.
Step 4: Add Candy Sprinkles
Gently fold in half of the candy sprinkles into the batter to distribute them evenly throughout.
Step 5: Bake
Pour the batter into your prepared baking dish and spread evenly using a spatula. Sprinkle additional candy sprinkles on top before placing it in the oven. Bake for about 20-25 minutes or until golden brown.
Step 6: Cool and Cut
Once baked, allow the cookie bars to cool in the pan for about ten minutes before transferring them to a wire rack to cool completely. Cut into squares when cool.
Transfer to plates and enjoy these delightful cookies as a perfect finishing touch!

Tips and Tricks
Here are some helpful tips to ensure the best results for your dish:
- Even Mixing: Make sure to mix all ingredients thoroughly for consistent flavor throughout
- Baking Time Check: Keep an eye on baking times as ovens can vary; use a toothpick to check doneness
- Cooling Completely: Allowing your cookie bars to cool completely makes cutting easier without crumbling
Feeling inspired? Try another one of our great recipes.
Coconut Chocolate Easter Cupcakes
How to Serve Easter Cookie Bars
This Easter Cookie Bars is versatile and pairs wonderfully with:
- Coffee or Tea: A warm beverage enhances the sweet flavors of the bars, making for a delightful treat.
- Whipped Cream: Adding a dollop of whipped cream creates a creamy contrast that elevates the dessert experience.
- Vanilla Ice Cream: The cold ice cream complements the warm cookie bars, creating a delicious temperature contrast.
Feel free to pair it with your favorite sides for a personalized meal!

Elevate your meals with these hand-picked recipes.
Zesty Lemon Bars
Make Ahead and Storage
- Make Ahead: You can prepare the dough for Easter Cookie Bars up to two days in advance. Store it in an airtight container in the refrigerator. When ready to bake, allow the dough to sit at room temperature for about 15 minutes before spreading it into the pan.
- Storing: Once baked, let your Easter Cookie Bars cool completely. Store leftovers in an airtight container at room temperature for up to five days. For longer storage, you can freeze them by wrapping each bar in plastic wrap and placing them in a freezer-safe bag for up to three months.
- Reheating: To reheat, place a cookie bar on a microwave-safe plate and heat for about 10-15 seconds until warm. Alternatively, you can reheat in a preheated oven at 350°F (175°C) for about 5 minutes for better texture.
Love this? Try these other crowd-pleasing recipes!
Easy Fall Pumpkin Bars
Suggestions for Easter Cookie Bars
Use Fresh Ingredients
Using fresh ingredients is crucial for making delightful Easter Cookie Bars. Old or expired ingredients can lead to subpar flavor and texture. Always check the expiration dates on your baking supplies, especially eggs, butter, and baking powder. Fresh eggs will ensure a better rise, while high-quality butter adds richness. Additionally, using fresh vanilla extract enhances the overall taste. Don’t forget to use vibrant, colorful sprinkles or chocolate chips to make your cookie bars festive. Remember that freshness contributes significantly to the final outcome; it’s worth investing in quality ingredients for this special treat.
Measure Ingredients Accurately
Accurate measurement of ingredients is essential when baking Easter Cookie Bars. Baking is a science, and even slight variations can impact your results. Use proper measuring cups and spoons for dry and wet ingredients. For flour, spoon it into the measuring cup instead of scooping directly from the bag to avoid packing it down. If you have a kitchen scale, consider weighing your ingredients for precision. This attention to detail ensures that your cookie bars achieve the perfect consistency and taste. Skipping this step may lead to dense or overly crumbly bars.
Don’t Overmix the Batter
Overmixing the batter is a common mistake that can ruin your Easter Cookie Bars. When you combine the wet and dry ingredients, mix until just combined. Overmixing introduces too much air into the dough and can cause gluten development, resulting in tough bars instead of soft, chewy ones. Stir gently with a spatula or wooden spoon until no dry flour remains visible. This technique preserves the tender texture we all love in cookie bars while still ensuring they hold together beautifully once baked.
Allow Cooling Time
Letting your Easter Cookie Bars cool properly before slicing is crucial for achieving clean cuts and maintaining structure. If you cut them while they are still warm, they may crumble or fall apart. After removing them from the oven, allow them to cool in the pan for about 10-15 minutes at room temperature before transferring them to a wire rack. Once fully cooled, slice them into squares or rectangles with a sharp knife for neat edges. This patience pays off with visually appealing and easy-to-eat treats that everyone will enjoy.

Hungry for more inspiration? Browse more tasty dishes
Decadent Pumpkin Cheesecake Bars
FAQs
What are Easter Cookie Bars?
Easter Cookie Bars are delightful treats made by combining cookie dough with festive flavors and toppings suited for the holiday season. These bars often feature pastel-colored sprinkles, chocolate chips shaped like eggs, and seasonal flavors like lemon or coconut. They are easy to prepare and offer a convenient way to serve dessert during family gatherings or parties. The simplicity of cutting bars rather than individual cookies makes them a popular choice for celebrations like Easter.
How do I store leftover Easter Cookie Bars?
To store leftover Easter Cookie Bars effectively, first ensure they are completely cooled after baking. Place them in an airtight container lined with parchment paper to prevent sticking. You can keep them at room temperature for up to three days or refrigerate them for longer freshness—up to one week if sealed properly. If you’d like to store them longer, consider freezing them by wrapping individual pieces in plastic wrap followed by aluminum foil or placing them in a freezer-safe container.
Can I customize my Easter Cookie Bars?
Absolutely! One of the best features of Easter Cookie Bars is their versatility. You can customize these treats based on personal preferences or dietary needs by adding different mix-ins such as nuts, dried fruits, or various types of chocolate chips. You could also alter flavors by incorporating extracts like almond or coconut into your dough. Topping with seasonal candy like mini chocolate eggs or edible glitter adds extra festive flair as well.
How do I know when my Easter Cookie Bars are done baking?
To determine if your Easter Cookie Bars are done baking, start by checking the edges after about 20-25 minutes in a preheated oven at 350°F (175°C). The edges should appear slightly golden brown while the center remains soft but not gooey—if it looks shiny, give it a few more minutes but watch closely not to overbake! A toothpick inserted into the center should come out with just a few moist crumbs attached but not wet batter.
Perfect your cooking skills with more recipes here.
Easy Strawberry Cheesecake Snack Bars
Conclusion for Easter Cookie Bars
In conclusion, creating delicious Easter Cookie Bars requires attention to detail throughout the process—from using fresh ingredients and accurate measurements to avoiding overmixing and allowing ample cooling time before slicing. Customization options abound; feel free to experiment with different flavors and toppings that suit your tastes while keeping traditional elements intact. By following these guidelines, you’ll impress friends and family this holiday season with delightful desserts that look stunning on any table setting! Happy baking!
Description
Easter Cookie Bars are the perfect festive treat to celebrate the joyous holiday with family and friends. Bursting with vibrant colors and delightful flavors, these soft and chewy bars are incredibly easy to prepare, making them a hit at any gathering. With a simple blend of ingredients that come together seamlessly, you can whip up a batch in no time. Adorned with colorful candy sprinkles, they not only taste amazing but also look stunning on any table setting. Whether served at an Easter brunch or during a spring picnic, these cookie bars promise to delight everyone and become a cherished tradition. Bake them ahead of time for added convenience, allowing you more time to enjoy the festivities!
- Preheat your oven to 350°F (175°C) and line a baking dish with parchment paper.
- Cream softened butter and sugar until light and fluffy. Add eggs one at a time, mixing well after each addition. Stir in vanilla extract.
- In another bowl, whisk together flour, baking powder, and salt; gradually blend this dry mixture into the wet ingredients until just combined.
- Gently fold in half of the candy sprinkles.
- Pour the batter into the prepared baking dish, spreading evenly. Top with remaining sprinkles before baking for 20-25 minutes or until golden brown.
- Allow to cool before cutting into squares.
Notes
For added flavor, consider mixing in chocolate chips or nuts.
To make them festive year-round, adjust the sprinkles to match different holidays or themes.
- Prep Time: 15 minutes
- Cook Time: 25 minutes
- Category: Dessert
- Method: Baking
- Cuisine: American
Nutrition
- Serving Size: 1 serving
- Calories: 180
- Sugar: 12g
- Sodium: 95mg
- Fat: 8g
- Saturated Fat: 5g
- Unsaturated Fat: 2g
- Trans Fat: 0g
- Carbohydrates: 25g
- Fiber: 1g
- Protein: 2g
- Cholesterol: 30mg
Keywords: – For added flavor or texture, mix in chocolate chips or nuts.- Adjust the sprinkles’ colors to match various holidays or themes for year-round enjoyment.